Checking the first item off my summer 2019 bucket list!
Last summer at a flea market, I stumbled upon the cutest small, blue suitcase. The vendor told me it was a train case from the 1950's or 60's and I knew I had to have it. If I remember correctly, I bought it for $10, however the vendor was hesitant to sell it to me for such a low price. She made me promise that I would clean it up and make it into something beautiful so I said absolutely.
When I got home with my new train case, well new to me, I looked up a little bit about the history of train cases. There wasn't too much to find, but I learned that they were first used in 1948, when trains were more popular than planes, and served as a convenient way to carry toiletries when travelling. Basically, it's the perfect carry-on.
The condition of the case was not too bad, but there was plenty of room for improvement. I unfortunately do not have pictures of the case when I first bought it, however here are pictures of a similar case that is listed on Etsy.
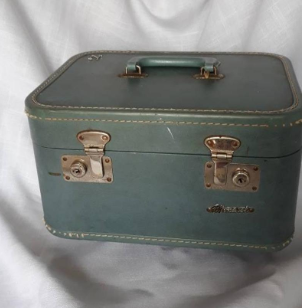


My case was similar in that it was kind of grimy on the outside making the blue look more yellowish, there was a stained fabric lining and the plastic piece for holding the toiletries, the top had that mirror with the outdated ruffles, and there was a distinct smell of Grandma's attic.
To start the process of improving my case I had to gut it. Now, I know the term "gutting" is really intimidating because it means ripping everything out and if you're like me you're probably scared of ruining something that you like and that you paid for. But this had to be done, and done aggressively. So I just started pulling at loose pieces, I used scissors a few times, but really it wasn't difficult. I removed all of the fabric from the top and bottom, the mirror and ruffles, and the plastic piece. Once you rip those pieces out (the fabric from the top, bottom, and sides), I recommend holding on to them to use as templates for later.
After your case is gutted, go ahead and clean up the outside. I just used a Mr. Clean magic eraser which did the job easily. Make sure to clean the inside rim of the case because it will be visible once we're done.
Here's what my case looked like after gutting and cleaning it:


As you can see here it doesn't look too pretty but that's okay because we'll be covering it in fabric! On the top of the inside I had to add a piece of thin, but sturdy cardboard to cover the metal pieces that were securing the handle. I just adhered this using tacky craft glue.
Now for the fun part! Fabric! I had some beautiful, bright floral cotton fabric on-hand because I like to pick things out from craft stores and never use them :) Luckily this is the perfect project for this fabric.
To add the fabric, I started with the sides of the case. Rather than adhering the fabric right to the case, I used 110lb card stock paper and glued the fabric to that then glued that to the case. You could use any thick paper or even thin card board. It just makes it a little sturdier and looks cleaner.
To do this, I measured the piece of the original fabric that I removed from the sides of the case. It was about 5"x34" although I made the length a little longer so that it would overlap. I then cut my card stock into pieces that were 5"x11". I adhered four of these pieces together using decoupage (I used Mod Podge Gloss Finish). They were glued end to end by overlapping an inch between pieces, creating a long strip of card stock. Once it's all glued together, test it out in your case. Make sure it fits properly, reaching all the way around with some overlap. Here is a picture of my card stock strip after cutting my fabric:

When you cut the fabric, make sure to leave at least an inch of extra fabric so that it can go around the card stock and be glued to the back. After cutting the fabric, iron it! Once it's in the case, you won't be able to smooth out any wrinkles!
Next, glue the fabric to the paper. Make sure to pull the fabric as tautly around the paper as possible. I just put some of the decoupage on to a paper plate, dipped an old paintbrush into it, and brushed the glue onto the paper. Then I pressed the fabric onto the glue. I recommend doing the two smaller ends first and then the long sides. Glue small portions at a time and don't rush. Enjoy the process!


Once the paper is covered in the fabric, its time to glue the piece into the case. Again, no need to rush, take your time to make sure it's how you want it. I recommend starting on the inside front because it is less visible when the case is open so it won't matter if the fabric is overlapped. I didn't do this because I thought I would be putting a piece of fabric on the inside back that would cover the hinges and the overlap, but in the end I decided against this which means the overlap is visible.
Just brush some decoupage onto a section of the fabric-covered paper piece and stick it to the case, holding it for a few seconds to make sure it stays. If you're having trouble making it stay in place, use a few clamps. I didn't have clamps on hand, but didn't really need them. Keep going section by section making sure to push the paper piece into the corners. Here's what it should look like when that piece is glued in:
Just brush some decoupage onto a section of the fabric-covered paper piece and stick it to the case, holding it for a few seconds to make sure it stays. If you're having trouble making it stay in place, use a few clamps. I didn't have clamps on hand, but didn't really need them. Keep going section by section making sure to push the paper piece into the corners. Here's what it should look like when that piece is glued in:


Next I started on the piece for the bottom of the case. This part was somewhat tricky because I wanted it to be perfect, but of course perfection is impossible so don't stress. For this you'll need a piece of cardboard and you'll want to use the old fabric as a template. Try to cut the cardboard to fit the bottom of the case. I didn't take the time to do measurements and make straight lines, but I should have. It took me three tries to cut the cardboard to fit the case well. Once you have that cut, cut the fabric the same way as before, leaving enough fabric to go around to the back of the cardboard. Remember to iron it! And then glue the fabric to the cardboard, same way as before with the decoupage. This time glue the corners first and then the sides.

Unfortunately, I didn't take many, or any, pictures of the next few steps. Just bear with me for a minute! So go ahead a glue that piece into the bottom of the case. I just brushed decoupage all over the back of it, put it into place, then put a big heavy book on top of it and let it sit there for a bit while I worked on the rest of the case.
Now we're going to do similar steps for the top of the case. Starting with the sides, measure how deep the lid of the case is. This will determine how wide your paper piece needs to be. Mine was about an inch and a half, so I created the same long card stock piece, but this time skinnier, and I covered it in fabric and then glued it into the case. I was struggling to make the skinnier piece stay in place so I used a whole bunch of plastic clothespins as mini clamps and used the side of a heavy book to make sure the piece was adhered where I wanted it.


For the top of the case, rather than using cardboard like we did for the bottom, I used a piece of thick interfacing. This makes it a little softer and allows me to cover that cardboard piece that I added earlier without it being uneven and wonky. There's probably other similar materials you could use like fleece fabric or felt if you don't have interfacing.
Like I did with the cardboard for the bottom, I cut a piece of interfacing to fit the top, cut the fabric to match, ironed the fabric, and glued the fabric to the interfacing. Unfortunately, I ran out of decoupage so for this part I used a hot glue gun. You could probably use hot glue for the entire project, however when using hot glue you have work faster because it dries faster and it tends to be a lot messier than decoupage. But for this part it wasn't too bad. I glued the corners followed by the sides and then glued the piece into the case.

And then I was done! It really didn't take too long to complete this project and I absolutely love how it turned out!


Have you tried a project like this before? Feel free to comment about your experience and a picture of how yours turned out!
Also, if you find a case and give this a try let me know! I would love to see your diy refurbishment!
And if you have any questions about the process or my experience doing this, please feel free to ask in the comments!
Now here are some suggestions based on my mistakes or what I would have done differently:
- Put the overlap of fabric that is on the inner sides in the front of the case where it will be less visible and for the top of the case put the overlap on the upper side (both closest to the latches that close the case).
- When I tried to close the case after completing all the steps I realized that the fabric around the sides of the top was a little too thick, especially where the overlap was. I ended up trimming back the end of the fabric so that it didn't overlap. After fixing this, the case would close, however not as smoothly as before. It doesn't really bother me much but if it's something that would bother you, maybe use a thinner material rather than thick card stock or cardboard for the top sides. Or make that strip thinner, leaving room for the case to close (refer to the top rim of the bottom part of the case to know how much room to leave uncovered).
- Make sure to take your time to pull your fabric tight around the paper and cardboard pieces. This will just make everything look cleaner and well put-together when it is all glued into the case.
- When gluing the corners for the top and bottom pieces, try to work the fabric into a rounded corner around the cardboard/interfacing. To do this, glue very small sections at a time so that you can shape the fabric how you want.
Here are some other options for your train case project:
- Add a center piece of fabric over the hinges. As you can see in the photos of the original case, there is a piece connecting the top of the case to the bottom. If you add this piece, you can put the overlap of fabric on the back of the inner sides because it would be covered. Again I would recommend using the original fabric that was removed from the case as a template.
- Add a layer of interfacing or fleece in the bottom of the case. If you want the bottom of your case to be softer rather than hard, you could add a layer of thick interfacing or fleece (like I used for the top) between the cardboard and the fabric. Just glue the interfacing to the cardboard and then the fabric over it.
- Change up the outside of the case. Maybe paint it. I didn't want to do this because I loved the vintage blue but if you want to change it up, go for it! Just make sure to research what the best type of paint would be for this project. You could also decoupage something to the outside of the case such as clippings from a magazine or newspaper.
- Add elastic to the inside to hold things. Depending on what you want to use your case for, you could add elastic loops to the fabric to hold things such as toiletries, art supplies, etc. This probably would involve some sewing and would need to be done after you cut the fabric but before you glue it to the paper/cardboard/interfacing.
Where to get your own vintage train case:
- There are many listings on Etsy for vintage train cases that are various styles and at reasonable prices. Just click here to check them out. Or if you want one like mine, click here.
- Ebay also has plenty of styles of vintage train cases at various prices.
- Flea markets or thrift stores. Some train cases are pretty common while others are more rare. Keep an eye out for one you like when you're browsing your local flea market or thrift store.
Comments
Post a Comment